Using Mass Actions in Contacts
Mass Actions allow you to efficiently make changes or send communications to multiple contacts at once. Whether it's exporting, deleting, reassigning, or sending mass emails, Mass Actions simplify bulk updates.
Before diving into Mass Actions, it's important to understand the following:
Anatomy of Contacts Table View - Learn how to adjust columns, the number of visible contacts, and navigate pages.
- How to Filter Contacts - Filtering helps you find and select specific contacts for mass actions.
💡 Use filters to segment contacts for easy edits.
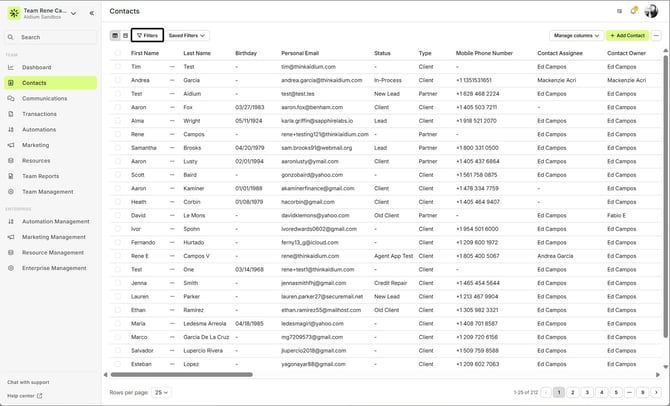
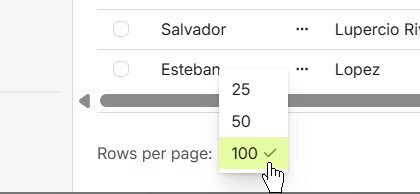
Next, you will want to set the # of contacts per page to include enough to fulfill your goal. There is a maximum of 100 contacts at a time.
⚠️ Mass Actions are only available in the Contacts Table View, not the Pipeline View.
- Add to Automation(s)
- Export Contacts to CSV (spreadsheet)
- Merge Contacts
- Manage Tags
- Transfer to Another Team
- Delete Contacts
- Reassign Contacts
- Mass Email
Important: “Select Across Pages”
The Select Across Pages option lets you select all contacts in your filtered results, not just those visible on the current page.
Actions supported with Select Across Pages include:
Add to Automation(s)
Export Contacts
Reassign to Team Member
Actions not supported with Select Across Pages:
Mass Email
Merge Contacts
Delete Contacts
For these actions, you’ll need to select contacts page by page.
Add to Automation(s)
When adding contacts to an automation(s) it will activate the automation(s) available to that user. Each contact will begin the automation immediately after they have been added.
- Once the Filter(s) are set and you have the number of visible contact desired, check the top 'check-box' in the column header to select all visible contacts. Pay close attention to the '# contacts selected' - this represents the number of contacts you are about to add to the automation(s).
- Click on "Add to Automation(s)".
- In the pop-up, select the automation(s) and click Confirm.
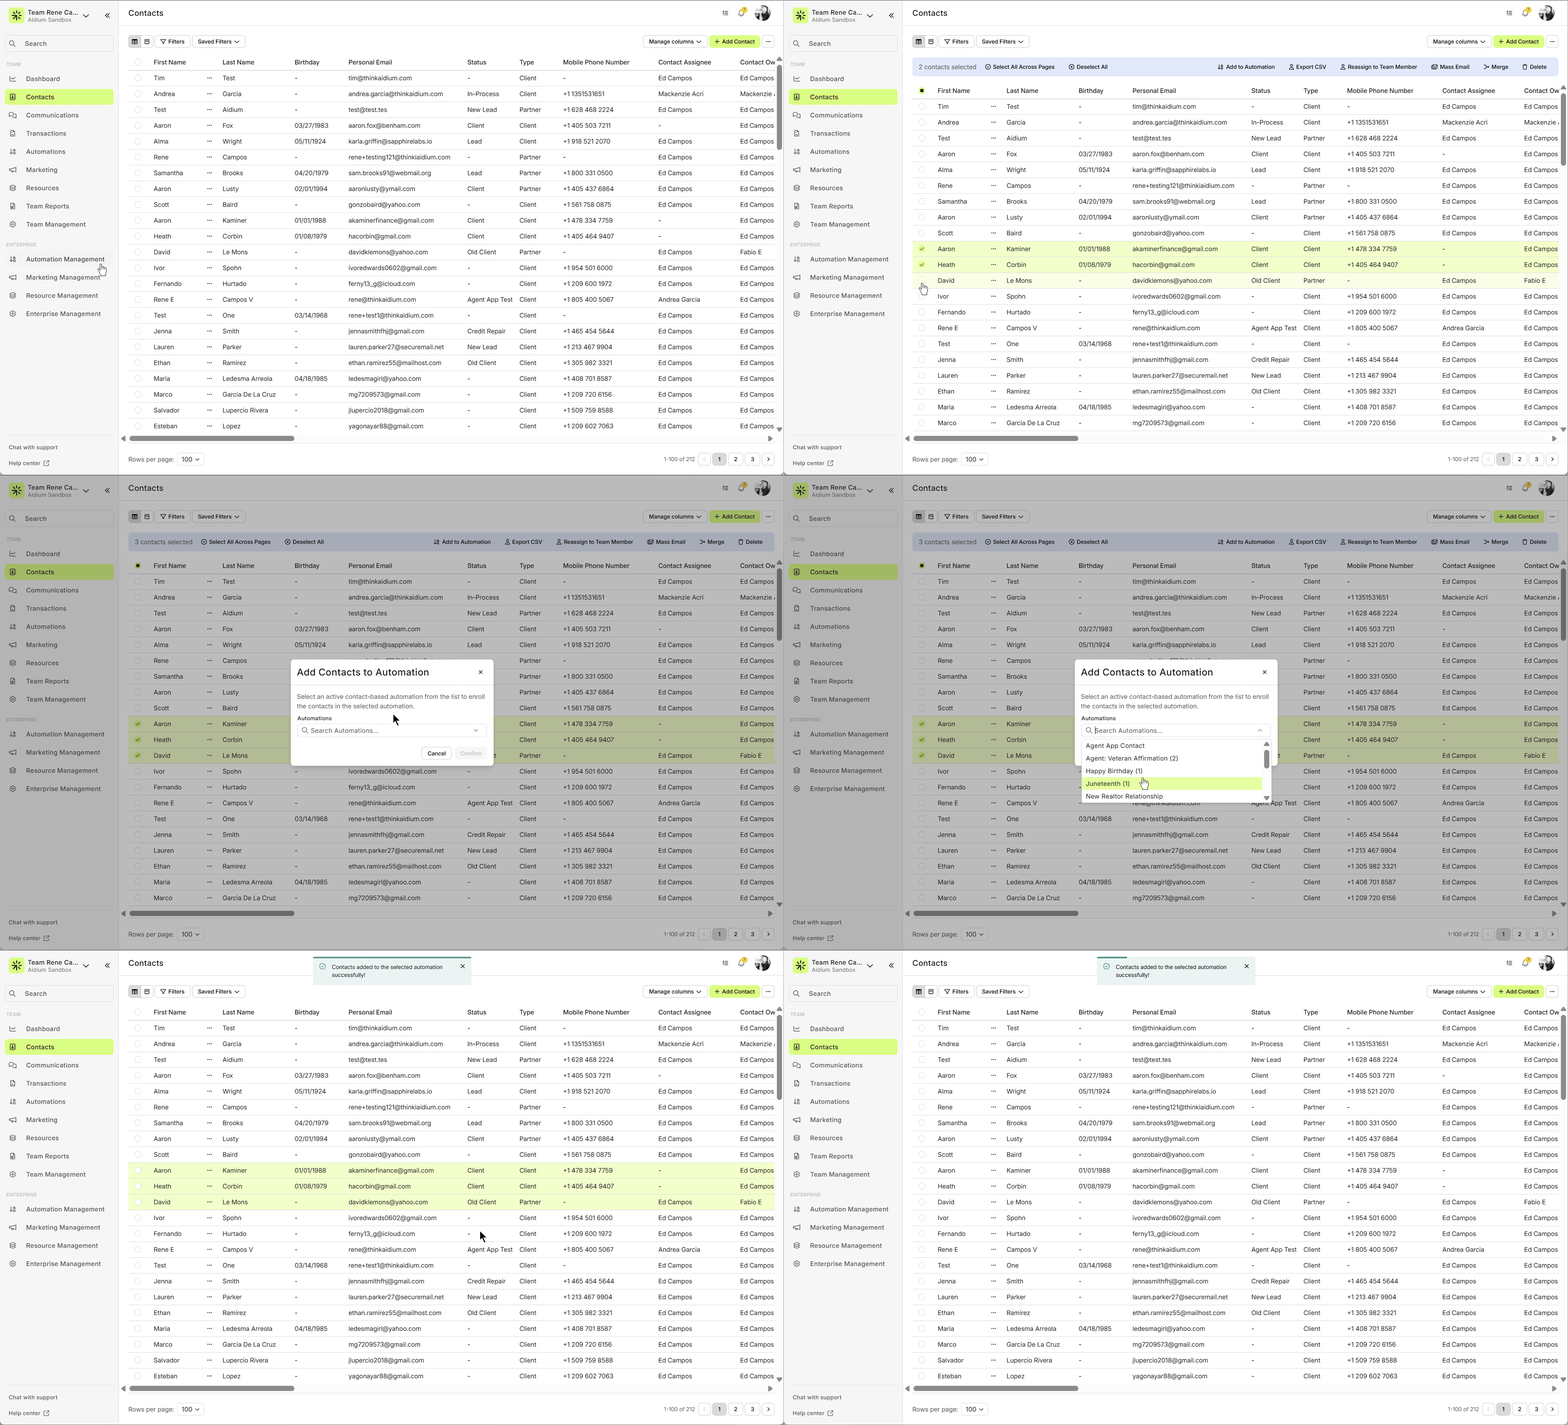
👍 This concludes assigning Contacts to automation(s).
Export Contacts to CSV
When exporting contacts, you will want to also ensure the columns desired are showing. To do so, click the 'Manage columns' button to verify or make visible the fields you want to export.
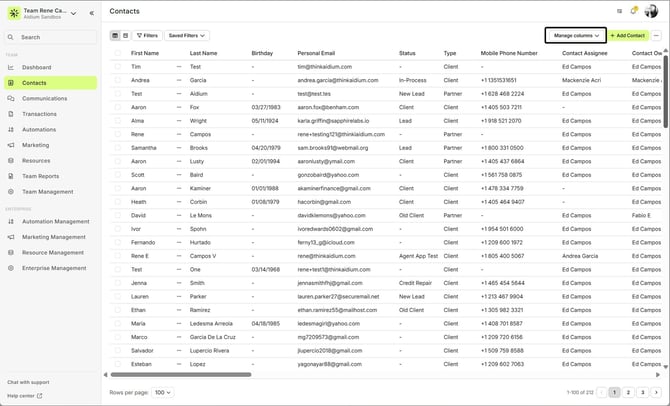
- Once the Filter(s) are set and you have the number of visible contact desired, check the top 'check-box' in the column header to select all visible contacts. Pay close attention to the '# contacts selected' - this represents the number of contacts you are about to export.
Click "Export CSV" in the dark gray bar.
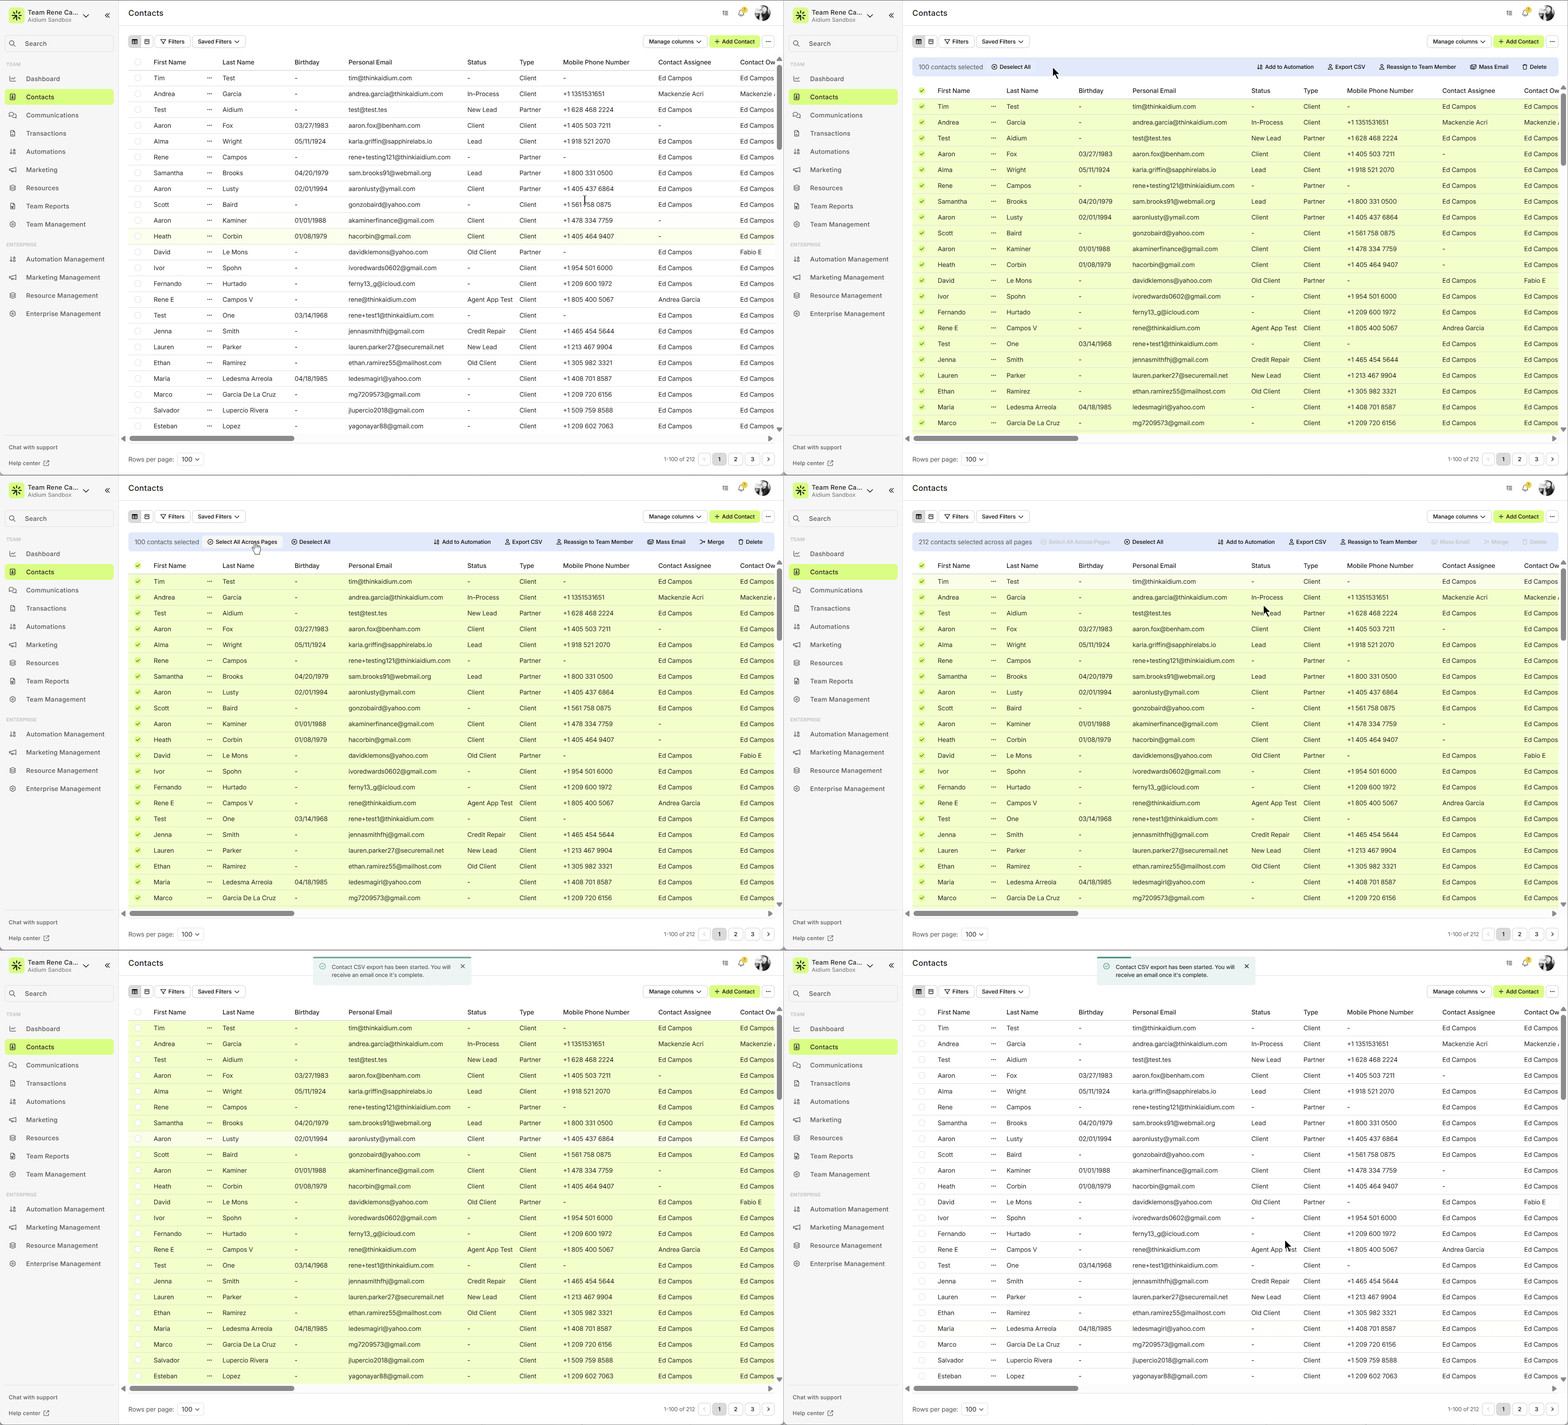
- Your CSV export should download automatically - However, depending upon your browser settings, it may prompt you to approve the download before it will begin.
The CSV file can be found either in your downloads folder, or where your browser settings determine.
👍 This concludes exporting Contacts to a CSV file.
Transfer to Another Team
The Transfer to Another Team action allows you to move multiple contacts from one team to another in bulk.
This works similarly to transferring an individual contact, but allows you to transfer multiple records at the same time.
Steps:
- Apply filters and select the contacts you want to transfer.
- Click Transfer to Another Team from the Mass Actions toolbar.
- In the Transfer drawer:
- Select the destination team.
- Select the user who will be assigned to the transferred contacts.
- Review and confirm that you have read the support article.
- Click Transfer.
 The transfer will run as a background process. Once completed, the user who started the transfer will receive a notification email.
Manage Tags
The Manage Tags action allows you to add or remove tags from multiple contacts at the same time.
Steps:
- Apply filters and select the contacts you want to update.
- Click Manage Tags from the Mass Actions toolbar.
- Choose whether you want to:
- Add tags
- Remove tags
- Select the tag(s) you want to apply.
- Review the number of contacts that will be updated.
- Click Submit.
Managing Multiple Tags
When selecting multiple tags:
- The system will show the total number of contacts that match the selected tags.
- Updates will only apply to contacts that require a change.
Examples:
- If all selected contacts already have the tag you want to add, the submit button will be disabled.
- If removing a tag that none of the selected contacts have, the system will notify you that no matching contacts were found.
Automation Behavior During Tag UpdatesBulk tag updates will also run automation entry checks.
⚠️ For large updates, automation checks are rate limited to prevent performance issues.
Delete Contacts
😱 Deleting Contacts is permanent. Be sure to verify the # of contacts selected and visually scan the selected contacts before deleting.
- Once the Filter(s) are set and you have the number of visible contact desired, check the top 'check-box' in the column header to select all visible contacts. Additionally, you can select individual contacts by clicking the 'check-box' next to individual contacts, as the below GIF demonstrates. Pay close attention to the '# contacts selected' - this represents the number of contacts you are about to delete.
Click "Delete" in the dark gray bar.
- Last, you will receive the 'Bulk Delete Contacts' warning message. It is important to understand the ramifications of deleting contacts that are either linked to another Contact (like, Referral) or linked to a Transaction (like, Borrower or Buyer's Agent).
If you are ready to proceed with deletion, click the red 'Delete' button. If you do not want to proceed, just click the 'Cancel' button.
😱 Deleting Contacts is permanent. Be sure to verify the # of contacts selected and visually scan the selected contacts before deleting.
Click "Delete" in the dark gray bar.
If you are ready to proceed with deletion, click the red 'Delete' button. If you do not want to proceed, just click the 'Cancel' button.
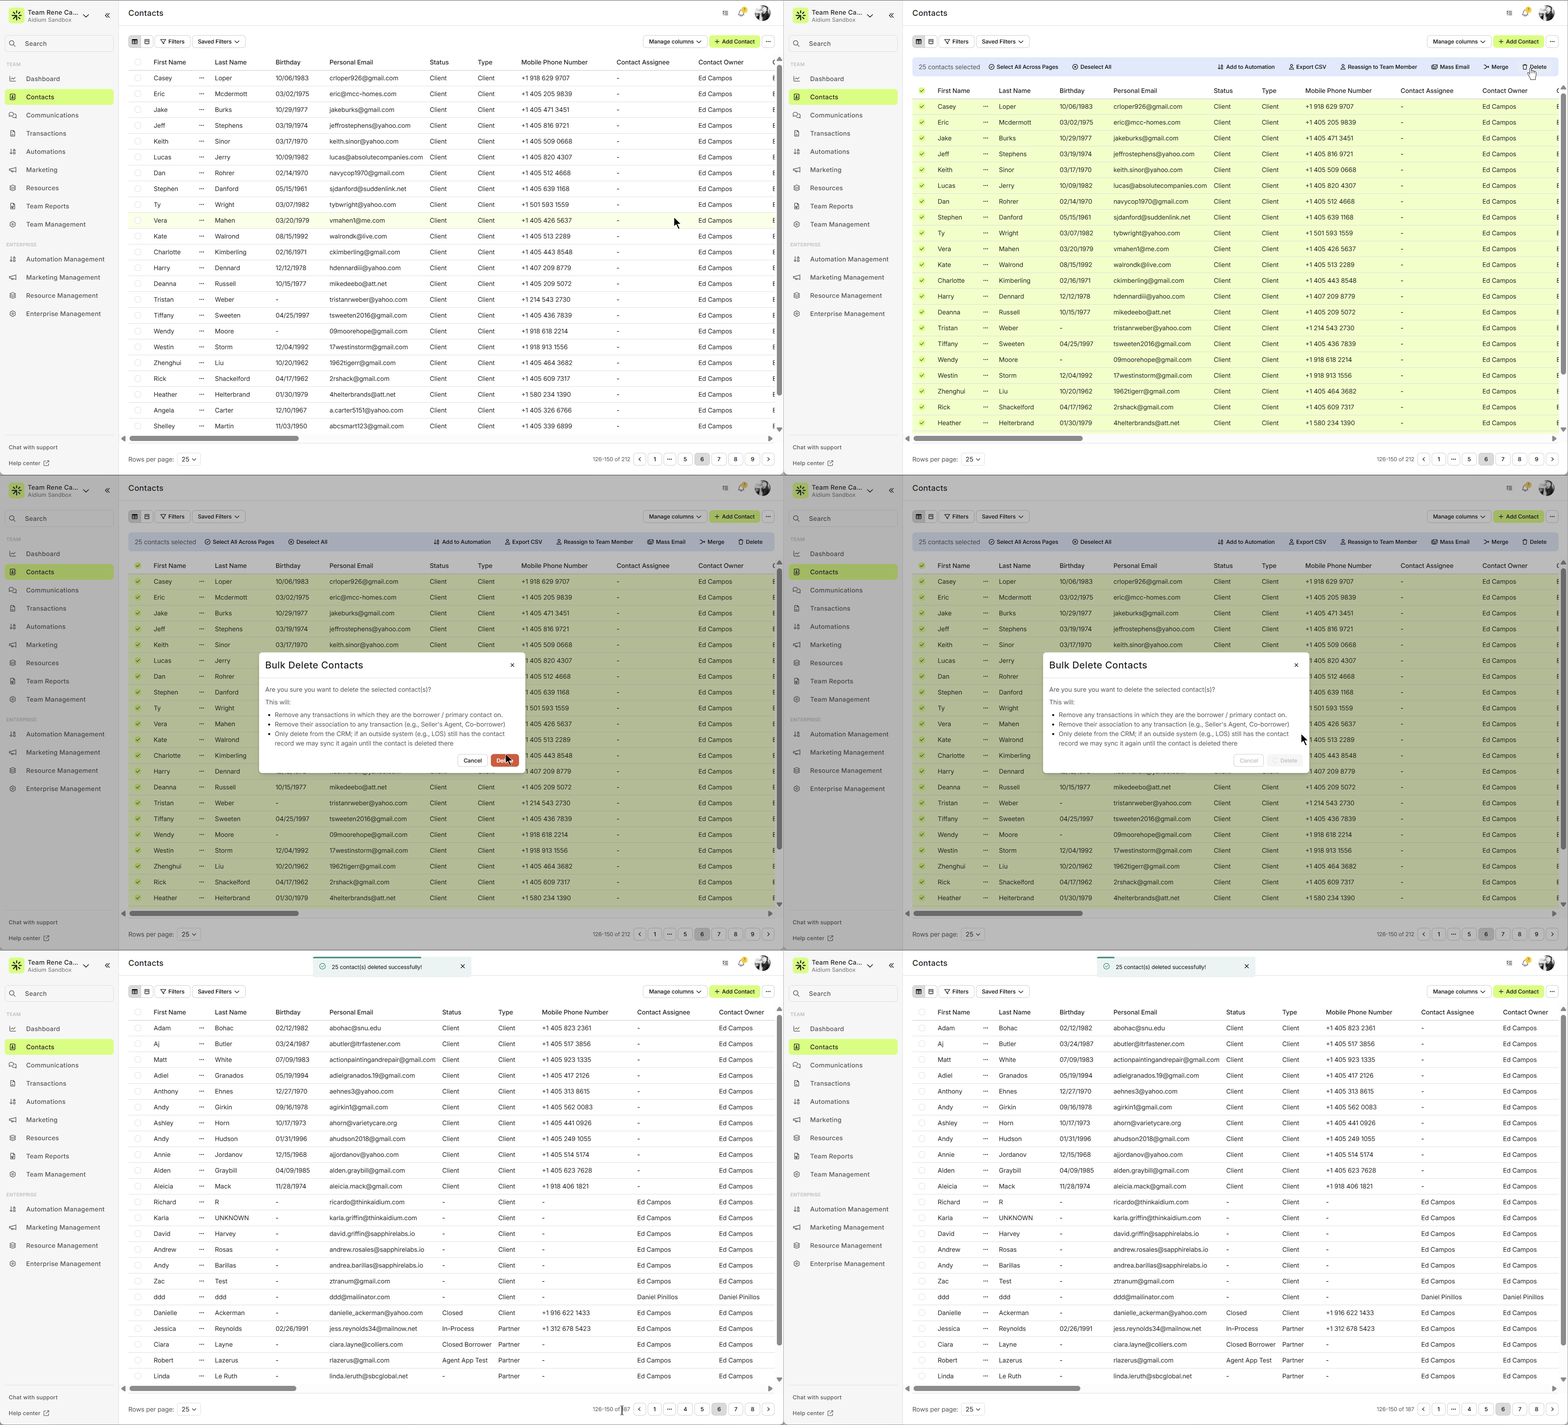
👍 This concludes deleting Contacts using Mass Actions.
Reassign Contacts
When reassigning contacts, you are telling the system that your contact is now being managed by another team member. This does not change the 'Contact Owner', but updates the 'Contact Assignee' to be a different user that you choose.
⚠️ Depending upon the automation and communication strategies in your team, automation(s) may be triggered, unassigned or emails sent from a different user.
- Once the Filter(s) are set and you have the number of visible contact desired, check the top 'check-box' in the column header to select all visible contacts. Pay close attention to the '# contacts selected' - this represents the number of contacts you are about to reassign to another team member.
Click "Reassign to Team Member" in the dark gray bar.
- Last, you will receive the 'Reassign to Team Member' dialog box. Click the 'Select a team member' drop-down and choose the user your would like to reassign the contacts to.
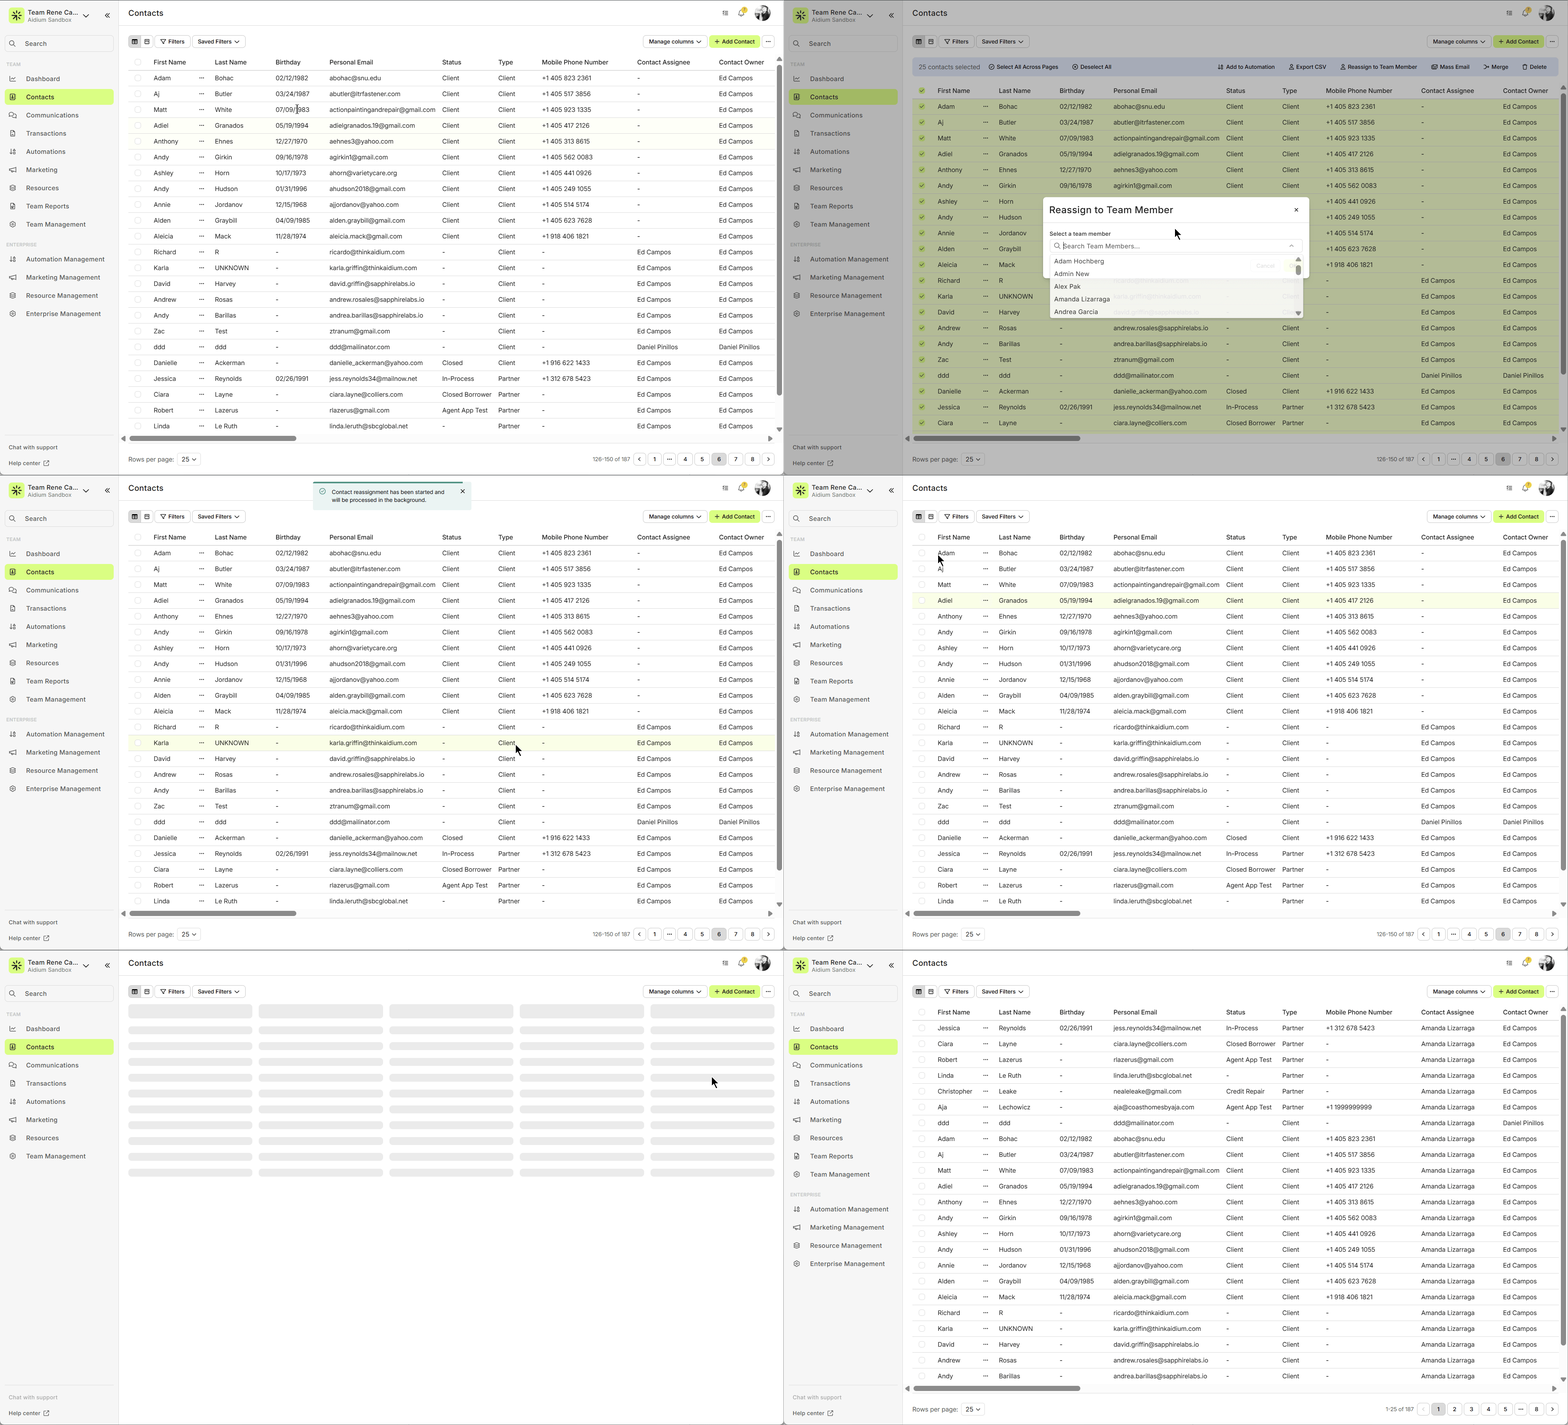
When you made your selection, just click the green 'OK' button. If you do not want to proceed, just click the 'Cancel' button.
👍 This concludes reassigning Contacts using Mass Actions.
Merge Contacts
Merging allows you to combine duplicate contacts into a single record.
Steps:
Set filters and select two or more contacts you want to merge.
Click Merge Contacts in the dark gray bar.
Choose the primary contact that will retain the information.
Review the data to confirm which fields to keep.
Click Confirm Merge to complete the action.
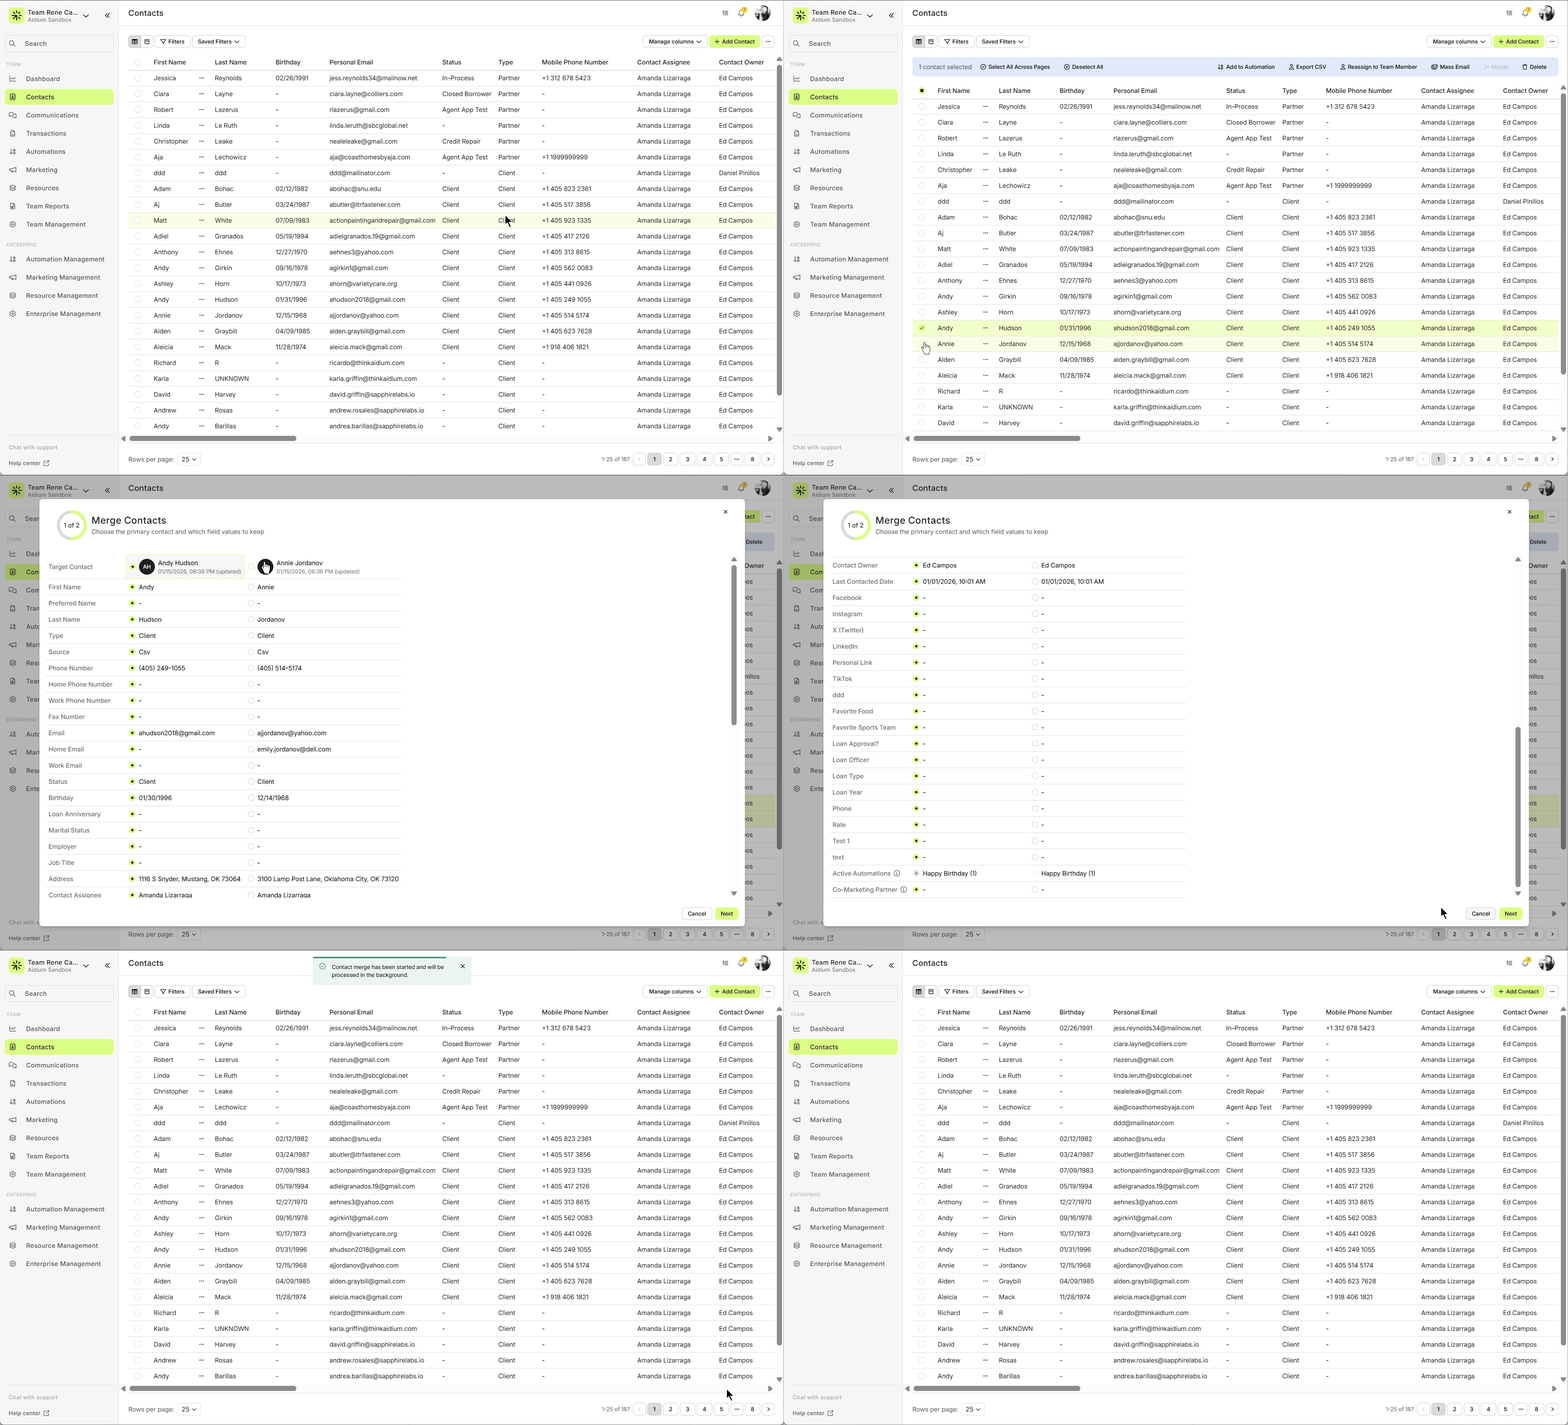
⚠️ Merging cannot be undone. Make sure to verify the contacts selected and the data to be retained.
👍 This concludes merging Contacts using Mass Actions.
Mass Email
- Once the Filter(s) are set and you have the number of visible contact desired, check the top 'check-box' in the column header to select all visible contacts. Additionally, you can select individual contacts by clicking the 'check-box' next to individual contacts, as the below GIF demonstratest. Pay close attention to the '# contacts selected' - this represents the number of contacts you are about to email.
Click "Mass Email".
- Create the email you would like to send to your contacts in the email builder.
Click "Send Email" once you're ready.
Click "Mass Email".
Click "Send Email" once you're ready.
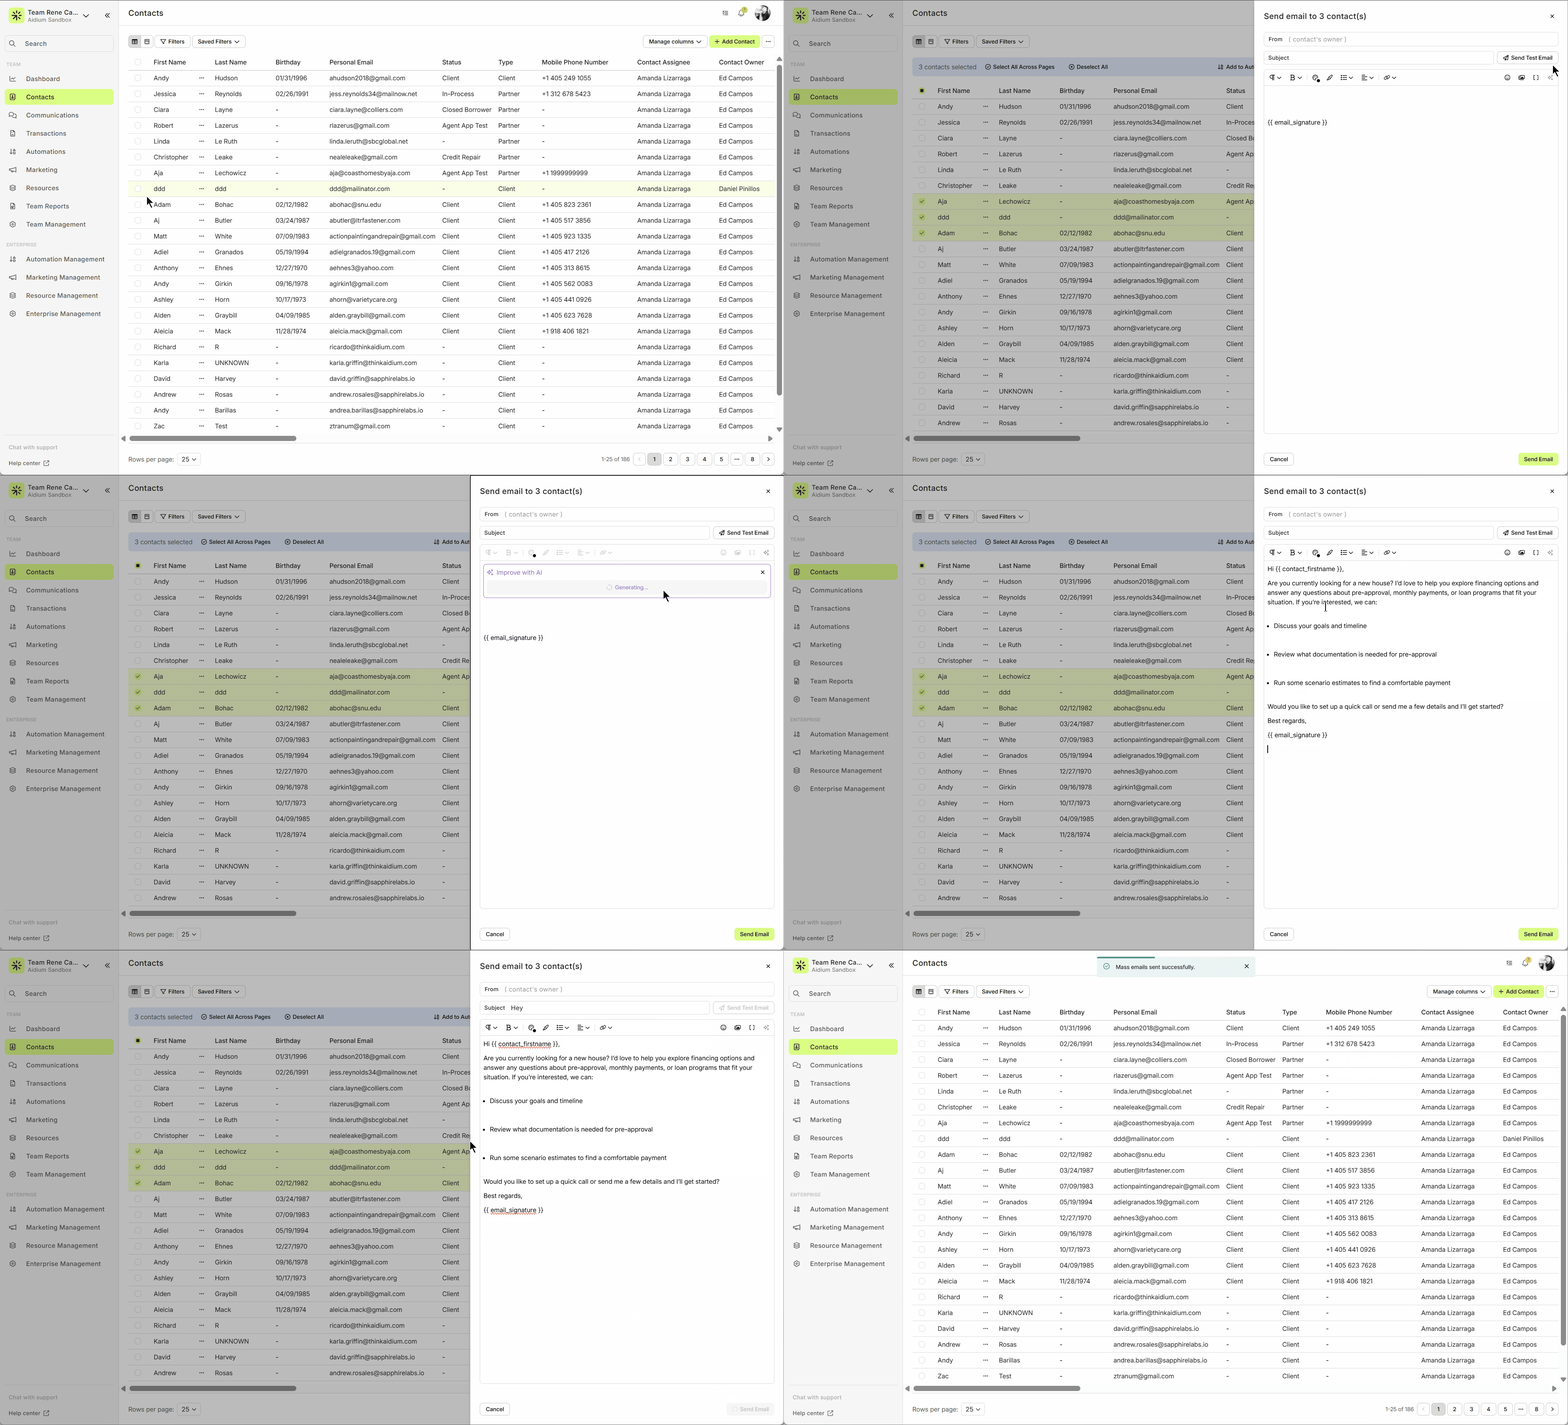
⚙️ Check out our How to build and send an email to a contact to complete step 3. Click here to learn more!
⚙️ Using saved filters can help organize groups of contacts to save time in the future when sending mass emails. Click here to learn more!
👍 This concludes how to send a mass email from the contacts page.
Related Articles
Contacts - Table View vs. Pipeline View
There are two easy-to-change views within Contacts. Table View, for a customizable list of contacts for a traditional spreadsheet style experience. While Pipeline View provides you with pre-sorted previews of each contact according to their Status. ...Bulk or Batch Update Contacts
There may be times when you want to update contacts in bulk, or in a batch. It's incredibly easy to update the Status or add a Tag to large number of contacts, either automatically based on their current state or with mass actions to pick and choose. ...Transfer Contacts to Another Team
Lendware allows you to transfer contacts between teams, making it easier to manage changes within your organization, support team growth, and maintain accurate contact ownership across your Enterprise. A contact transfer moves a contact record from a ...Contact View – Related Contacts Tab
The Related Contacts tab in the new contact view makes it easy to link any contact to another using a relationship type. This helps your team quickly understand connections, keep track of referrals and partners, and streamline communication. There’s ...Merge Contacts Guide
Combine multiple contacts into one clean record while keeping key information intact. Duplicate contacts can clutter your database and create confusion. The Merge Contacts feature allows you to combine multiple contact records into a single Target ...