Transfer Contacts to Another Team
Lendware allows you to transfer contacts between teams, making it easier to manage changes within your organization, support team growth, and maintain accurate contact ownership across your Enterprise.
A contact transfer moves a contact record from a source team to a destination team while carrying over important contact information and team data when possible.
Because each team can have its own configurations, such as automations, tags, statuses, and custom fields, there are some limitations and behaviors you should understand before performing a transfer.
 Before transferring contacts, review the sections below to understand what data transfers, what does not, and what may happen after the transfer is completed.
1. What Data Transfers Between Teams?
When transferring a contact, the following information is transferred:
Contact Information
✅ Name
✅ Email address
✅ Phone number
✅ Contact details
Communication History
✅ Notes
✅ Communication history
Tags
✅ Existing tags on the contact are transferred.
If a tag exists on the source team but does not exist on the destination team:
The tag will automatically be created on the destination team.
The transferred contact will retain that tag.
Status
✅ Contact status is transferred.
If the status does not exist on the destination team:
The status will automatically be created.
The transferred contact will be assigned that status.
Custom Fields
✅ Custom contact fields are transferred.
If a custom field exists on the source team and contains a value:
The field will be created on the destination team if needed.
The existing value will transfer with the contact.
2. What Data Does Not Transfer?
The following information is not transferred:
❌ Linked contacts and relationships
Examples:
Spouse
Co-borrowers
Realtors
Other related contacts
❌ Transactions
Contacts associated with transactions cannot be transferred.
❌ Existing automation progress
The contact's current position inside an automation does not transfer.
Example:
If a contact was halfway through an automation on the source team, they will not continue from that same step after transfer.
3. Automation Behavior After Transfer
After a contact transfer is completed, Lendware will run automation entry checks against the transferred contact.
If the contact matches automation trigger conditions on the destination team:
The contact may enter available automations on the destination team.
 Bulk transfers may take longer because automation checks are processed gradually to protect system performance.
4. Who Can Transfer Contacts?
The ability to transfer contacts depends on the user's access level.
CRM Admins and Owners
- Can transfer contacts between teams because they have access to all teams.
Team Leads
Team Leads can transfer contacts if:
They are a member of both the source team and destination team.
5. When Will a Transfer Fail?
A contact cannot be transferred if:
Duplicate Contact Exists
A matching contact already exists on the destination team with:
The same email address.
The same phone number.
Both email and phone number.
Contact Has Transactions
A contact cannot be transferred if they are associated with any transaction.
This includes:
Being linked to a transaction.
Being listed as a borrower or co-borrower on a transaction.
6. Bulk Contact Transfers
Lendware supports transferring multiple contacts at once through Mass Actions.
For more information, see:
Using Mass Actions in Contacts
When performing bulk transfers:
The same transfer rules and validations apply.
Invalid contacts will not be transferred.
A completion email will be sent to the user who started the transfer.
The email will include a CSV file containing contacts that could not be transferred and the reason they failed.
7. Transfer Processing Time
Transfers are processed in the background.
For large transfers, completion time depends on the number of contacts being moved.
To protect system performance:
Automation entry checks are rate limited.
Large transfers may take additional time.
Example:
A transfer of approximately 10,000 contacts may take around 2 hours to complete.
Automation entry checks are rate limited.
Large transfers may take additional time.
How to Transfer a Single Contact to Another Team
Only one contact can be transferred at a time using the individual contact transfer option.Before starting:
- Confirm you are working in the correct team by checking the team name in the top-left corner.
- Navigate to the Contacts section.
- Make sure you are in List View.
- Use filters if needed to locate the contact you want to transfer.
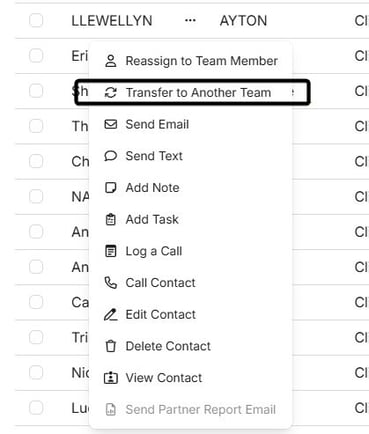
Once you find the contact:
- Click the ellipsis (...) next to the contact name.
- Select Transfer to Another Team.
Complete the Transfer
A transfer drawer will appear on the right side.
Complete the following:
- Verify the correct contact is selected.
- Select the destination team.
- Select the user who will be assigned to the contact on the destination team.
- Confirm that you understand the transfer requirements.
- Click Transfer
Transfer Completion
Once the transfer is complete:
- A confirmation notification will appear in the top-right corner.
- The contact will now belong to the destination team.
Mass Transfer Contacts to Another Team
Mass Transfer allows you to transfer multiple contacts from one team to another at the same time.
This works similarly to transferring an individual contact, but instead of moving one contact at a time, you can select multiple contacts and process the transfer as a bulk action.
Mass Transfer is available from the Contacts Table View using the Mass Actions toolbar.
Before performing a Mass Transfer, make sure you review the transfer requirements and limitations explained above.How to Initiate a Mass Transfer
- Navigate to the Contacts section.
- Make sure you are in List View.
- Use filters to identify the contacts you want to transfer.
- Select the contacts you want to transfer.
You can select:
- Contacts from the current page.
- Contacts across multiple pages using Select Across Pages.
- Click Transfer to Another Team from the Mass Actions toolbar.
Complete the Transfer
A transfer drawer will open on the right side.
Complete the following:
- Select the destination team.
- Select the user who will be assigned to the transferred contacts.
- Confirm that you understand the transfer requirements.
- Click Transfer.
Transfer Completion
The transfer will run in the background.
Once completed:
- The user who initiated the transfer will receive a notification email.
- Any contacts that could not be transferred will be included in a CSV attachment with the reason they failed.
Need to transfer multiple contacts? Use Mass Transfer from the Contacts Table View to move multiple contacts at once. The same transfer rules, limitations, and validations apply to both individual and bulk transfers. Always review the selected contacts and destination team before completing a transfer.Related Articles
Using Mass Actions in Contacts
Mass Actions allow you to efficiently make changes or send communications to multiple contacts at once. Whether it's exporting, deleting, reassigning, or sending mass emails, Mass Actions simplify bulk updates. Before diving into Mass Actions, it's ...Contact View - Summary Tab
The Summary tab in the new Contact View acts as a snapshot of your contact’s most important details and recent activity. It offers a streamlined overview of tasks, communications, transactions, and more—all in one place. When opening a contact, the ...Contact View – Related Contacts Tab
The Related Contacts tab in the new contact view makes it easy to link any contact to another using a relationship type. This helps your team quickly understand connections, keep track of referrals and partners, and streamline communication. There’s ...Contact View - Transactions Tab
The Transactions tab is a straightforward way to view and interact with every transaction (loan) that a single contact is associated with. Whether a borrower, co-borrower, real estate agent or other loan related contact - it will display. This tab ...Reassign a Contact to New Owner or New Assignee
In Lendware, you can easily reassign a contact to a new Owner or add a Contact Assignee to share access with another team member. Below are the steps for both actions. There are two types of association on each Contact for User ownership and ...