Lendware Integration: Mortgage Coach
This guide provides a comprehensive overview of the Mortgage Coach integration within Lendware. By connecting your Mortgage Coach account, you can seamlessly generate and manage presentations directly from your Lendware transaction records.
Overview
With the Mortgage Coach integration enabled:
- Users can connect their Mortgage Coach account using an API key
- Create presentations directly from transactions
- Seamlessly send borrower and loan data into Mortgage Coach
- Access a shareable presentation link from within the platform
Setting Up the Integration
To connect your Mortgage Coach account:
- Go to User Profile
- Navigate to the Integrations tab
- Locate the Mortgage Coach card
- Enter your API Key from Mortgage Coach
- Click Create
Once the integration is successfully set up:
- A confirmation message will appear
- A new option will be available within transactions:
“Create Mortgage Coach Presentation”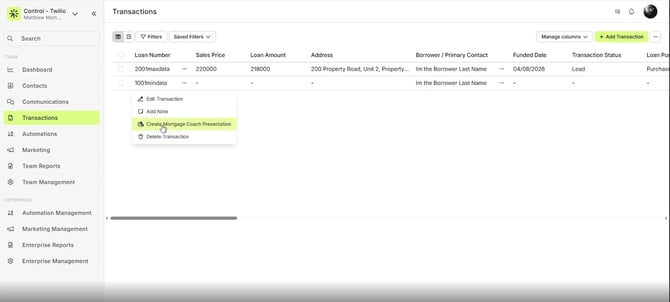
Note: You can find your API Key in Mortgage Coach under Settings > Contact tab, near the bottom of the page.
Only the API key is required. No additional application keys are needed.
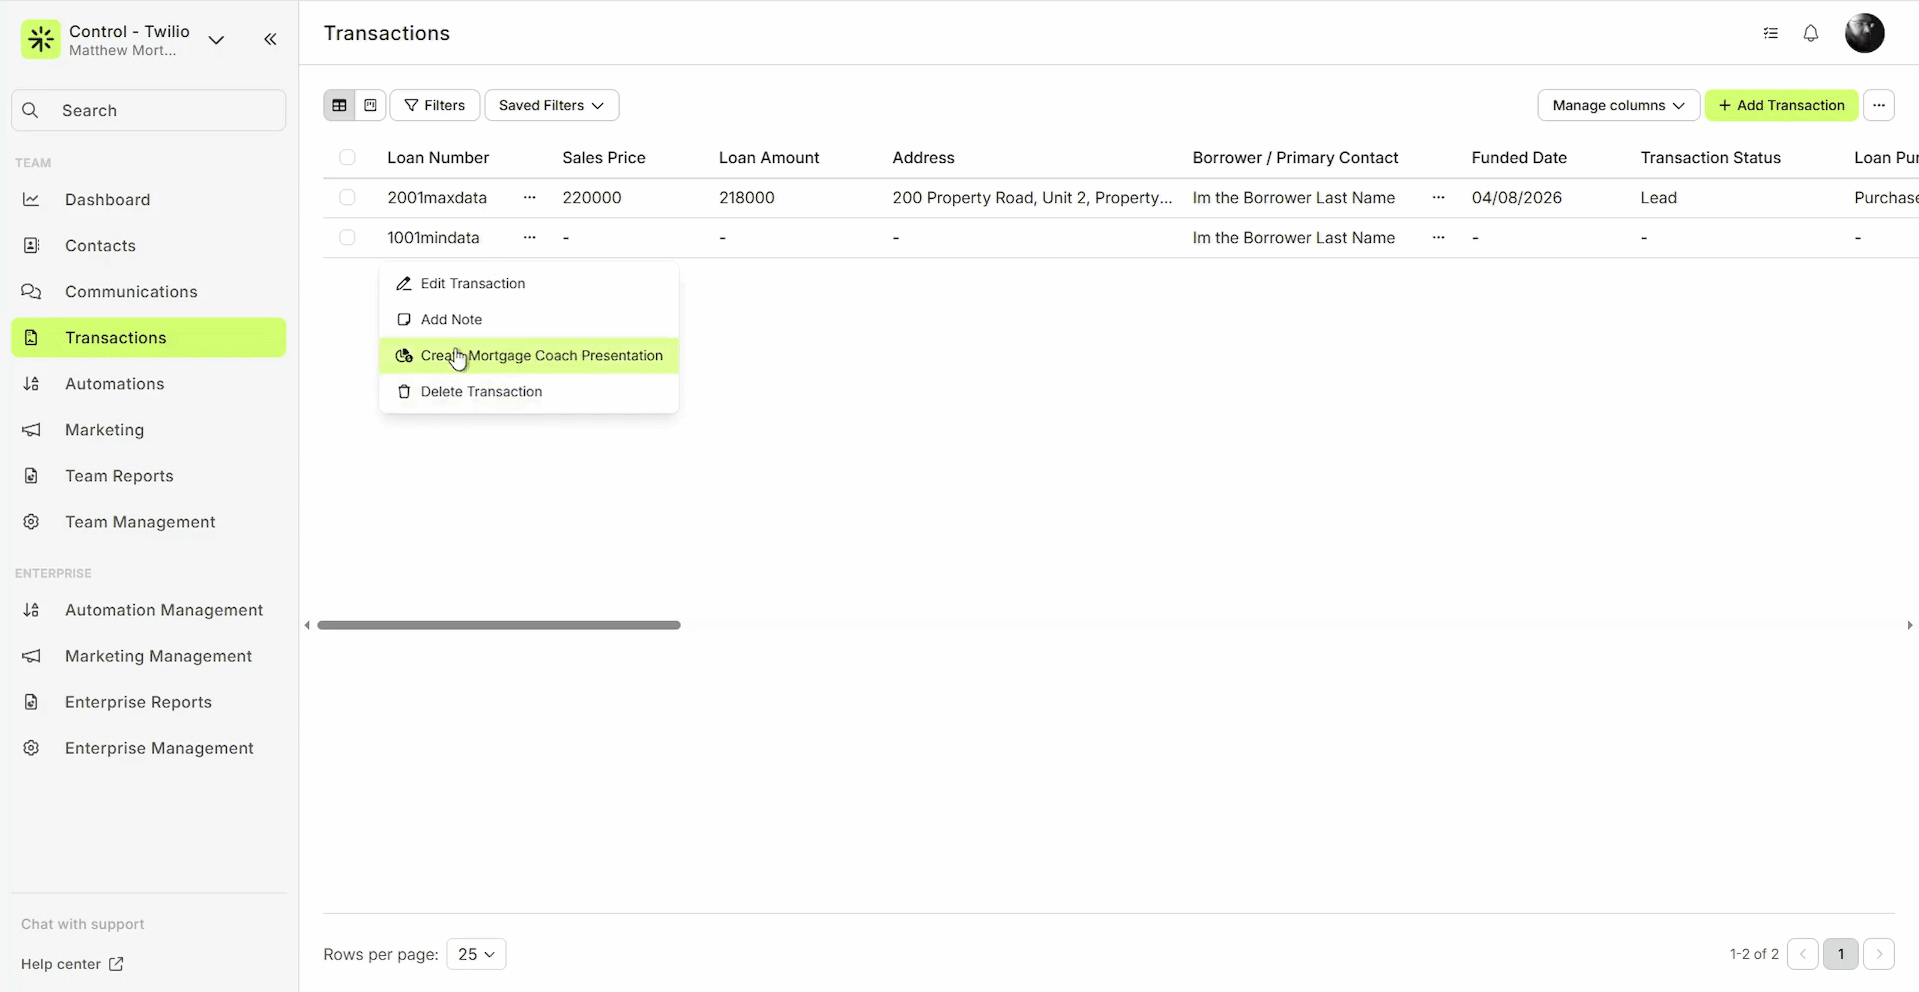
Creating a Mortgage Coach Presentation
With the integration active, you can generate presentations directly from the transaction list page.
- Open the context menu on a transaction.
- Select Create Mortgage Coach Presentation.
- A drawer will open, automatically populating available data from the transaction record, including:
- Borrower's Information (read-only)
- Gross Income
- Property Address
- Property Value
- Additional available fields based on the transaction data
Auto-population depends on the data available in the transaction. Missing fields will remain blank.
Note: If you need to create a new or different report for the same transaction, you can use the “Create New…” button in the modal after generating a report.
Configuring Presentation Details
Within the presentation drawer, you can configure the specific details of the report. Fields marked with a red asterisk (*) are required to generate the presentation, while all other fields are optional and can be used to further pre-populate the report in Mortgage Coach.
Required Fields:
- Product Name (e.g., "AAA")
- Loan Purpose
- Loan Amount
- Interest Rate
- Term
Optional Fields:
- Earnest Money
- Insurance
- Funded date
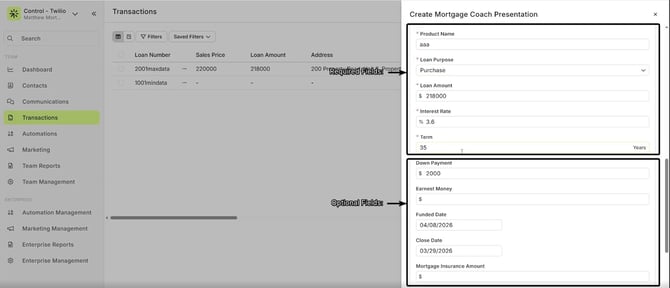
Optional fields help pre-fill Mortgage Coach but can also be completed later directly in Mortgage Coach.
Product Name will always be blank by default and must be filled in manually
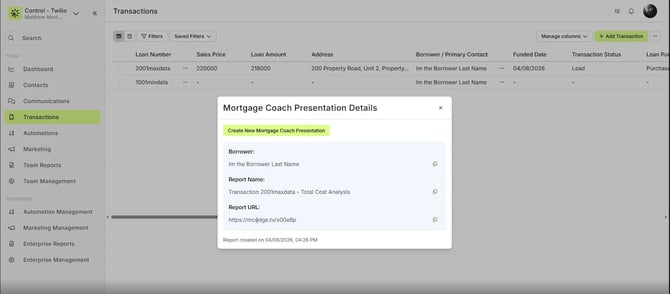
Submitting the Presentation
After filling out the required fields:
- Click Submit
- A success message will appear
- A modal will display:
- Borrower name
- Report name
- Presentation link (URL)
Managing Generated Reports
Once a report is generated, you can access it via the provided quick URL or directly within Mortgage Coach.
Accessing via Quick URL
The quick URL provided in the success modal allows you to view the report in your browser. This is the link you will eventually share with your customer after finalizing the report in Mortgage Coach.
Accessing via Mortgage Coach
To further customize and finalize the report, log into your Mortgage Coach account.
- Navigate to the Automated tab.
- Locate the newly generated report (the transaction you just pushed from Lendware).
- Click on the report to view the pre-populated data, including borrower information, contact methods, and property details.
- Fill in any remaining blank fields or zeros to complete the report before sending it to your customer.

The report may require additional edits in Mortgage Coach before sending it to the borrower.
Disconnecting the Integration
If you need to disconnect the Mortgage Coach integration:
- Navigate to User Profile > Integrations
- Locate the Mortgage Coach card
- Click Remove Integration

- A confirmation modal will appear — click Remove to confirm
Once completed, a confirmation message will appear indicating the integration has been successfully removed.
After disconnecting, the “Create Mortgage Coach Presentation” option will no longer appear in the transaction context menu.
⚠️ Important Considerations
Only data that already exists in the transaction will be transferred to Mortgage Coach. If any fields are missing or incomplete, they will not be automatically filled in the presentation. Additionally, generated reports are not considered final—users should review and complete all necessary details directly within Mortgage Coach before sharing them with borrowers.
Need more help? Check out: Encompass Integration Guide
Related Articles
LendingPad Integration
This guide provides a step-by-step explanation of how the integration works, how to set it up, and what to expect during daily use. You will also find troubleshooting tips and best practices to ensure a smooth operation. Key Benefits How It Works ...Blend Integration
Blend is one of the most recognized point-of-sale (POS) systems in the mortgage industry, streamlining the loan application experience for borrowers. ⚠️ Please note that this integration is currently in Beta. Please refer to this article regarding ...Lendware Azure Entra SAML SSO & SCIM Integration Guide
This guide provides step-by-step instructions for configuring Single Sign-On (SSO) and automated user provisioning (SCIM) between your Microsoft Entra (formerly Azure AD) environment and Lendware. By completing this integration, your team members ...Encompass Integration Guide
Using Encompass, loan officers can originate loans and push the relevant borrower, partner, and loan data to Lendware. Pushing this data to Lendware allows us to trigger automations based on almost any criteria. Value Proposition for Loan Officers ...ARIVE to Lendware Connection Overview
Lendware LOS Connection via Zapier Basics If a loan origination system (LOS) has a direct integration with Zapier, we may be able to connect it to Lendware to add and update transaction and contact information from the LOS to our system. ARIVE and ...