Managing Multiple Automations on the Same Contact
This typically happens when multiple automations:
Target the same audience
Use similar entry conditions
Send messages within the same time window
Understanding how automations interact and how to manage their timing helps prevent contacts from receiving duplicate or excessive communications.
Why Automation Overlap Happens
Automation overlap occurs when multiple automations enroll the same contact at the same time or within a short period.
This typically happens when multiple automations:
Target the same audience
Use similar entry conditions
Send messages within the same time window
For example:
Automation A
Sends a welcome email sequence
Automation B
Sends a new lead follow-up sequence
If both automations trigger when a contact becomes a Lead, that contact may receive messages from both automations at the same time.
Understanding how automations interact and how their timing is configured can help prevent contacts from receiving duplicate or excessive communications.
How to Audit Which Automations a Contact Is Enrolled In
If a contact appears to be receiving multiple messages, you can review their automation activity directly from the contact record.
To review automation enrollment
Open the contact record
Navigate to the Automation tab
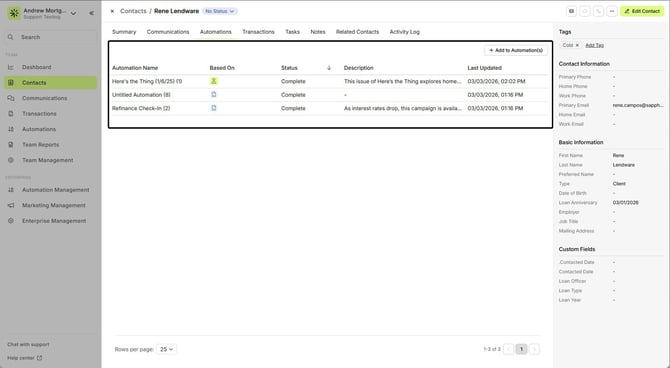
Here you can see all automations the contact has been enrolled in. These may include:
Contact-based automations
Transaction-based automations related to transactions associated with the contact
Reviewing the Activity Log
You can also review automation activity from the Activity Log tab.
The Activity Log shows when automation actions were performed and which automation triggered them.
Examples of actions you may see include a contact being enrolled in an automation, emails or SMS messages being sent, tags being added, and other actions executed based on the configuration of the automation workflow.
This activity history helps identify which automations are currently affecting the contact.
If a contact receives multiple messages within a short time frame, reviewing the Activity Log can quickly reveal which automations triggered those messages.
How to Prevent Overlapping Automations
The best way to prevent automation overlap is to ensure that automations target different scenarios or audiences.
Use More Specific Entry Conditions
Instead of broad conditions such as:
Contact Status = Lead
Consider narrowing the automation using additional criteria such as:
Tags
Date fields
Custom fields
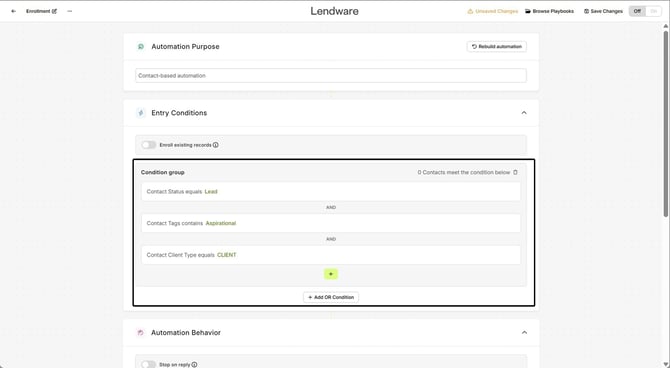
This helps ensure the automation only applies to the intended contacts.
Use Exit Conditions
Exit conditions help remove contacts from automations once they no longer meet the intended criteria.
Examples include:
Contact Status is not equal to Lead
Contact does not have a specific tag
A date field no longer meets the condition

Using exit conditions ensures contacts automatically exit automations when they no longer qualify.
Please note that Exit Conditions are evaluated at the same time as entry conditions. If a contact or transaction meets both entry and exit conditions, it will not be added to the automation.
How to Stagger Timing Across Automations
If multiple automations may apply to the same contacts, consider spacing out the timing of messages.
For example:
Automation A
Email sent immediately
Follow-up after 1 day
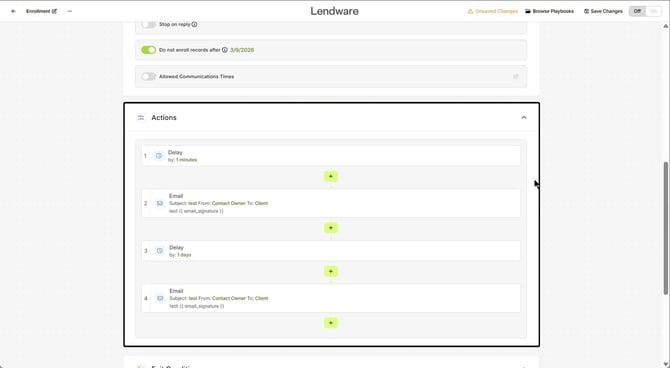
Automation B
First email sent after 2 days
Follow-up after 1 additional day
This approach helps prevent contacts from receiving multiple communications on the same day.
When designing automations, review message timing across workflows to avoid sending multiple communications within the same timeframe.
When to Use Stop-on-Reply
The Stop-on-Reply option automatically stops an automation when a contact replies to a message.
When Stop-on-Reply is enabled, any reply from a contact will suspend the remaining messages in that automation, and no further actions in that workflow will execute.
This feature is useful for sequences designed to start conversations rather than continue sending automated messages after engagement.
Example Use Cases
Lead follow-up campaigns
Initial outreach sequences
Appointment scheduling reminders
If a contact replies, the automation stops so the system does not continue sending automated messages while a conversation is in progress.
Use Stop-on-Reply for automations intended to initiate conversations with contacts.
When to Use “Do Not Enroll After”
The Do Not Enroll After setting limits how long contacts can enter an automation.
This is useful when an automation is meant to run only during a specific time period.
Example Use Cases
A marketing campaign running for one month
A limited promotion
A seasonal outreach campaign
Once the specified date passes, new contacts will no longer be enrolled in the automation.
This helps prevent contacts from entering outdated or inactive campaigns.
The Do Not Enroll After setting controls how long records can continue entering an automation.
If the Enroll Existing Records toggle is disabled, enabling Do Not Enroll After will prevent the automation from enrolling any new records after the selected date. Because of how this logic works, both options cannot be enabled in a way that affects the same records at the same time—typically, you would use one or the other depending on whether you want to control enrollment for existing records or limit new enrollments after a certain date.
Best Practices for Sequencing Automations
When creating multiple automations, it is helpful to think of them as a communication timeline rather than separate workflows.
Consider the following best practices:
Avoid targeting the same audience in multiple automations at the same time
Ensure each automation serves a distinct purpose or stage in your workflow.
Review message timing across automations
Spacing messages over time helps prevent communication overload.
Use tags or status changes to move contacts between automations
This creates a structured progression instead of running multiple automations simultaneously.
Audit active automations periodically
Regularly review automation workflows to ensure they are not unintentionally targeting the same contacts.
Key Takeaway
Contacts can be enrolled in multiple automations simultaneously in Lendware. Without careful planning, this can result in overlapping sequences and excessive communications.
By reviewing automation entry conditions, staggering message timing, and using features such as Stop-on-Reply and Do Not Enroll After, you can design automation workflows that communicate effectively without overwhelming your contacts.
Need more help? Check out: Intro to Automations
Related Articles
Intro to Automations
Automations is your one area to create and manage all things automatically created or managed. From Transaction (loan) communications to Drip (nurture) campaigns to New Lead workflows, tasks and comms - Automations manage your best intentions. ...Using Tags and Status Changes to Chain Automations
Automation chaining allows one automation to trigger another by updating a tag, contact status, or field value. This technique helps create a structured workflow where contacts move through different stages automatically. For example: A lead ...Contact-Based Automations
Contact-based automations are designed to support your lead management, contact engagement, education, reminders, and more. These automations help you act on your best intentions without manual follow-up. What is a contact based automation Create new ...Repeat Automations
Repeat Automations allow teams to automatically re-run automation actions on a recurring schedule. This feature supports ongoing workflows such as recurring outreach, reminders, and partner reporting without requiring manual re-enrollment. Repeat ...Update Field Action in Automations
The Update Field action allows you to automatically update fields on contacts, transactions, and related records directly within an automation. This provides more flexibility than the previous Update Status action by allowing updates across multiple ...